Tuesday, June 29, 2010

First impression: Ti Caldera Keg-H

I'm a huge fan of the Caldera Cone system from Traildesigns and own several of their setups. The lightest is probably the Keg-H, shown below in an illustration from their website.


The Keg-H has worked great for me, but the cone itself is in bad shape, particularly the dovetail which has lost some of its shape, making it hard to assemble the cone. For that reason I contacted Rand from Traildesigns to ask if he could make me a custom titanium version so that I would get a lighter and more durable cone, as well as the ability to use it as a wood stove. I was not surprised when he told me they could make it happen, as they have been very helpful in the past and always offered great service.

I got the setup last week and got to play with it a little bit during the weekend. The following is as short description and first impression.

Below is a picture showing the different parts that are needed to use it in wood burning mode.


From the left: the cone, the two halves that make up the floor, the grates, the pot and two ti stakes.

To assemble you first put the two floor halves on the ground, and then the grates go on top (the fire is built on top of them - Rand told me that the extra air flow provided makes it a much better wood stove, a "poor man's Inferno").


The next step is to assemble the cone and put it on top, and then finally the two ti stakes are inserted into holes close to the top of the cone to form a base for the pot. Below is a picture of the completed setup. After taking this picture I moved the rubber band higher to protect it from the flames.


I found that it worked well as a wood stove, but it is a bit more smoky compared to a stove like the Bushbuddy which burns off much of the smoke through the secondary combustion. The pot got pretty sooty, but that is to be expected.


I also tried it in alcohol mode and not surprisingly it performed similarly to the aluminium cone, getting two cups to a boil in around 8 minutes using close to 20ml of alcohol. I was a bit apprehensive that the flames that came out of the fuel port and sometimes licked the rubber band would melt it, but it didn't affect it all. Below is how it looks assembled for alcohol burning - as you can see, only the cone and stove is needed, and the pot is inserted deeper into the cone to get a more snug fit and more heat transfer and retention.


Some stats to conlude this short review:

Pot 48g (ca 700ml capacity)
Grate top 12g
Cone 26g
Grate stand 3g
2 sheperd ti stakes 15g
Floor, 2 parts 15g
Total: 119g/4.2oz

(Alcohol stove is 14g )

Btw, Titanium Goat has a similar looking setup now called Ti-Microtus.

Wednesday, June 23, 2010

24: Hakkloa

I know I was supposed to do some gear reviews now, but I have to tell about a wonderful trip I did this weekend with Leif, one of my best friends. Our original plan was to hike to Katnosa, an area I've heard is very beautiful and containing some true wilderness on the hills surrounding it. There is also a DNT (norwegian tourist association) hut there, Katnosdammen, which I've heard is nice. It's not staffed, and has no food (dry goods) available for purchase (many huts do), but it's got canoes available for visitors which is a nice bonus. But, enough talk about that hut - we didn't get so far before deciding to make camp :). Turned out to be 22 km to that hut, which was a bit too far considering how late we started out.

I met up with Leif at the central station and we got on the train to Hakadal, which is only a short 30 min ride from Oslo. When we arrived in Hakdal we got out Leif's tent and split it between us - I carried half of the poles and the outer tent, totalling about 1.5 kilos which isn't that bad. More about the tent, or literally: palace, later. From Hakadal station we walked a couple of kilometers in light rain and on tarmac laden roads before reaching the trail head at Elnes. Weather wasn't the best, but spirits were high and we knew from the forecast that it would be nicer from 6pm and onwards, and great the next day.


Turned out that the trail wasn't that well maintained, but all the flowers and plants almost covering it up made it very nice to look at. We stopped several times to take pictures and enjoy the views.


(photo by Leif)


The trail was scarred some places by the effects of forest work, but nothing too bad. Leif spotted an elk and a couple of other animals on the way, which i felt was a good sign. They were probably so used to the place being calm and abandoned that they didn't have their ears wide open and their guard up. Sadly I didn't see any of the animals that Leif tried to point out. Guess I wouldn't be any good as a hunter, but that's something I'll never pursue anyway - I'm too much of a fan of animals to do that.

We decided to try to find a place to camp near the lake "Hakkloa" which the path lead too anyways. A kilometer or so before we got there we stopped to enjoy the views in the direction of Katnoa, before proceeding down the trail to the camp site.


The road led to a seemingly abandoned farm surrouned by a couple of huts. We got the feeling that the place was now being used by scouts or other organizations, but we weren't sure. Sets of chairs were visible through the windows, and we saw that people had been barbecuing down at the small beach a while ago.


Anyway - a nice spot for the tent was found near the lake and we pitched the tent in a stiff breeze. The tent is a Big Agnes Parkview 3 which Leif bought from me a short while a go, a 3 person, 3 season tent which is nothing short of a palace for two hikers. I like it a lot for the living space, easy pitching and sleek, aerodynamic profile.


Leif prepared an impressive Thai dish on his Trangia and we then proceed to take photos during the last few minutes before the sun disappeared over the horizon. The light is always so amazing then.


I slept very well that night - I am finally getting some good sleep in the outdoors!. We awoke to great weather and after a while a very hot tent. According to my mini themometer the temperature was about 30 degrees celsius.


To boil up some water for breakfast I used the Trail Designs Caldera Keg-H. It's a cool piece of kit I think, veighing a scant 6.2oz / 176gm and containing the combined pot stand and wind screen (the core caldera concept), a stove, pot (the can), lid, fuel, plastic container with cozy that can be used to eat out of and a stuff sack for the whole thing. Highly recommended.


(photo by Leif)

My only gripe with the setup is that the small cone has lost its shape after some use and the dove tail has been compressed so that it is hard to assemble it. I have therefore ordered a titanium cone from Trail Designs that is on its way. They've made me a set of crates for it too so that it will work better in wood burning mode.

After breakfast we hiked back to Hakadal again in glorious sunshine, mostly on gravel roads, being constantly passed by mountain bikers who were probably preparing for the "Birkebeinerritet" cycling event in August (world's largest mountain bike event). I participated a couple of years ago, but once was enough for me :). Great experience though.


Thanks for reading and please leave a comment if you feel like it.

Wednesday, June 16, 2010

Raffle: Photon Freedom Micro Light

I am giving away one of these to one of you readers. It's got a blue LED and comes with a clip so you can attach it to various things, for instance to a baseball cap to use as a head lamp, or maybe to the inner of your shelter to illuminate it?. It's quite bright for its size and has some nice features like brightness adjustment, four safety modes: slow/medium/fast/SOS and a morse code mode.


To be a part of the raffle you just have to leave a comment to this post with a mini review of your favourite piece of gear. Please include as a minimum a short description of the item, why you like it so much and a link to a product page or similar. Feel free to add more info. I'll draw a winner with random.org on thursday 1st of July.

In the meantime: take care and go out and hike!

Wednesday, June 9, 2010

Ultracheap gear

Want some very, very affordable gear? Well, I found some at a site I recently discovered: www.dealextreme.com. It's a Hong Kong based internet store that offers a lot of different products of varying quality, but prices are very low and world wide shipping is included in all prices listed! There are also lots of very honest and useful comments from buyers, even images and videos of them demonstrating the use etc.

Here are some items that I found that may be of interest. I've ordered some of them myself, but haven't received anything yet.

Men's Windproof Winter Fleece Balaclava Scarf Hat (Black)
for $5.79 including shipping.


Mini 2-Mode White Light Camping Lantern with Carabiner Clip
for $4.33 including shipping.

I ordered this one to use in my hammock and tent. Will just clip it to the ridgeline/gear loft. Weighs 1.55oz.


Black Flashlight Keychain 22000mcd 10-pack
for $4.47 including shipping (!). Incredible price for ten of these small LEDs that can be useful in many situations. I am going to clip one to the inside of all my packs to use when trying to find stuff in the dark.


Wilderness Survival Fire Sparkle and Blade Cutter Tool
for $4.95 including shipping.


Compass Keychain with Thermometer
$1.65 including shipping (!). I always carry one of these (mine is from Recta) to clip to the ridgeline of my hammock or somewhere else. I like to check the temperature every once in a while.


I am of course not in any way affiliated with dealextreme.

Please leave a comment and link if you find other similar deals at the site or elsewhere.

Monday, June 7, 2010

24: Solo trip to Halsjøen

I think I'm addicted to 24 hour trips - can't think of a better way to spend the weekend. I always tend to return refreshed and ready for another bout of the daily grind at work. This time was no different.


Lately I've been doing most of my hiking in the eastern part of the wilderness area surrounding Oslo, "Østmarka". It's closest to where I live and an area I don't know a lot about, so naturally I'm curious to explore it. Most people tend to go to the northern part, Nordmarka, probably since they know so little about what Østmarka has to offer.


(photo from Wikipedia)

I bought a book the day before with lots of trip suggestions and decided to try to find one of the highest hills in the area, called "Tronfjell". Seemed pretty easy when studying the map, but would soon prove to be a challenge.

I packed the ULA Ohm that Hendrik brought me to test, got on my scooter and scooted to the trail head Østmarkssætra. Loaded with full hammock rig, food and 2-3 litres of water the pack weighed about 9.5 kilos, which I found sapped my strength quickly in the heat - there is really something to the 10 kilo barrier that people talk about. 10 kilos and upwards is not fun at all. Still I made good progress and soon got to Mariholtet which is maybe the most popular staffed hut in the area.


From there I went south east toward the lake Halsjøen and Tronfjellet. The trail was nice and dry and well maintained, and I was grinning most of the way. At the intersection of two trails I set up a compass course to Tronfjell which was close by, but looked like this:


Didn't look very promising or penetrable - this is really the place to get lost, so I went higher up the trail to where it opened up a bit, set up a new compass course and took a leap of faith and got in there. Ended up at what seeemed the highest point, but nothing much to see except for trees. A bit disappointed, but eager to set up camp and eat, I returned to the lake Halsjøen where I found a nice spot to set up the hammock rig.


A typical hammock rig consists of the hammock itself of course, a tarp for weather protection and an underquilt for bottom insulation. It isn't as fast to set up as a tarp or small tent, well not for someone like me who is still a beginner, but boy is it ever comfortable to sleep in :), and so flexible when it comes to location. Only need two trees at about the correct distance. Peggable (is that even an english word?) ground is a bonus too since the tarp needs 4 pegs and the hammock two. The side facing the water was a bit tricky this time but I used my trekking poles to good effect and got the pegs in there.


I wasn't the only living creature in the area. A beaver was evidently a frequent visitor to the spot I had chosen. I never saw him, sadly, only the signs of his labour. Beavers are so cool animals. Did you know that a beaver can stay underwater for up to 15 minutes?


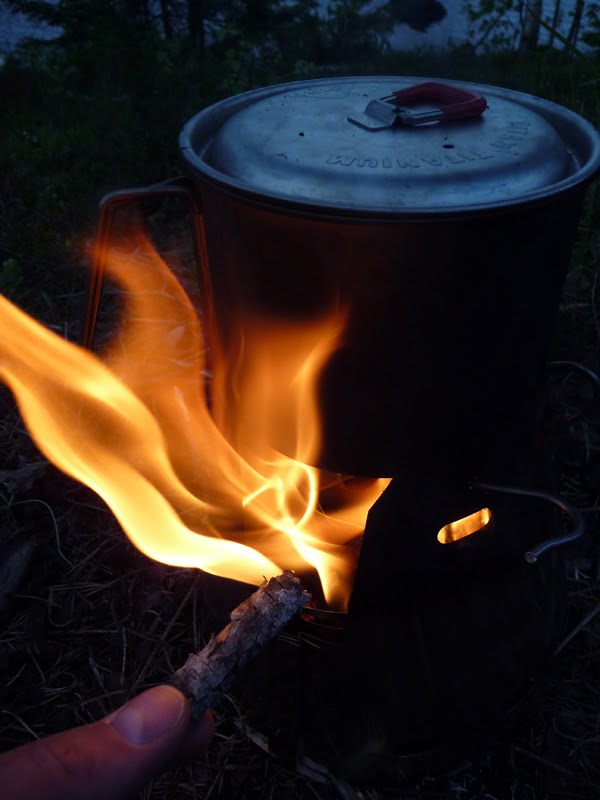
Being in the woods on a hot summer day, I of course opted for the wood stove, the Ti-Tri Inferno to be more precise. It's so fun to use and infernoesque in its intensity. I let it burn a good while after I was done cooking, just to keep the mosquitoes away and for the warmth and company.


I slept well that night, only needing to get up to adjust the tarp to deflect the chilly breeze from the lake. Found that it robbed the warmth from my down underquilt. Next time I'll bring my DIY weather shield. Morning greeted me with sunshine. I took my time making breakfast and enjoying it from the hammock, and then packing everything for the return trip.


Ti-Tri Inferno burning away in all its glory, fueled by dry wood which was to be found everywhere at the campsite.


The hammock makes for a great recliner!

The return trip was the best. Glorious sunshine and feeling refreshed, knowing that I had a full day left of my weekend to relax and enjoy myself.


So how did the Ohm work out? I was bit sceptical at first because I couldn't get the hip belt to fit in a comfortable way, but I sorted that out and then it was all good. Still don't fancy the non-elastic compression cords on the sides though. Will post a review at a later time.

This is also the last time I'll carry as much as 2 litres of water. From now on I'll carry an Aquaguard inline filter to be able to use whatever water I find on the way, and to use my camelbak in gravity filter mode in camp. This time I could probably just have drunk directly from the lake, I've done so before, but it tends to taste a bit off, so I would prefer to filter it. I made tea from the water in the lake of course. A filter would have been a lot more useful on the bivy+tarp trip I did with Glenn recently.

Base weight for this trip turned out to be 6.5 kilos, or about 14.3 pounds. Next time I'll probably go lighter with bivy+tarp.

I hope you liked this quick trip report. My next posts will be gear reviews.

Have a great week and take care!